Whether you’re an aspiring DIY enthusiast or a homeowner looking to refresh the look of your hardwood floors, sanding and refinishing them can prove to be a rewarding experience. If done correctly, this process can restore the original charm and beauty of your wooden floors. This guide will take you through the detailed steps of sanding and refinishing your hardwood floor, enabling you to achieve a professional-looking finish.
Step 1: Preparation
Before you start the sanding process, it’s important to prepare your floor. This means removing all furniture from the room, covering any doors or vents with plastic sheeting to prevent dust from spreading, and inspecting your floor for nails, staples or other debris. Use a pry bar and hammer to remove these objects, as they can damage your sander. Fill in any cracks or holes in your floor with a wood filler to create a smooth, even surface.
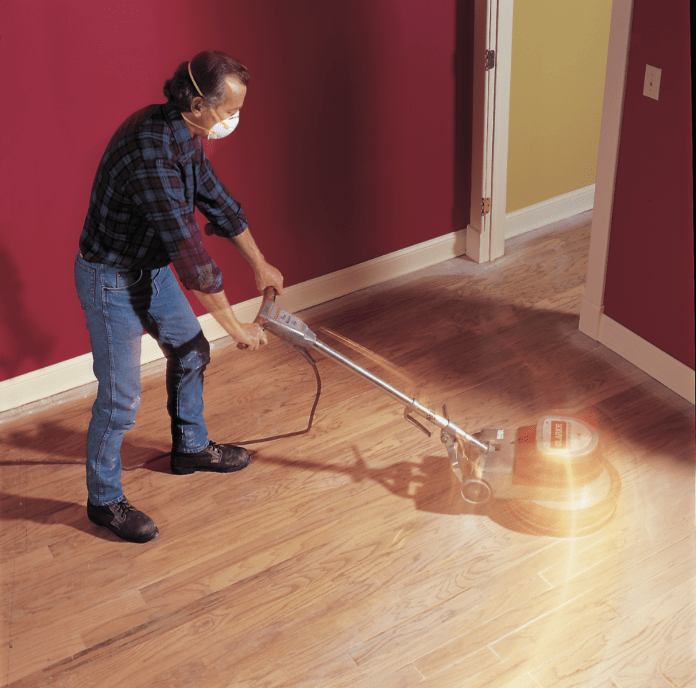
Step 2: Sanding – Start with a Coarse Grit
Now that your floor is prepared, you can start sanding. Attach a coarse-grit sandpaper (like a 36 or 40 grit) to your drum or orbital sander. Always start sanding at an angle to the grain – this will help you to remove the old finish and any scratches more effectively. Keep the sander moving to avoid creating dips or grooves in your floor.
Step 3: Sanding – Edges and Corners
Areas near walls, corners, and door frames that your large sander can’t reach will need to be sanded using a handheld sander. Again, start with a coarse grit and remember to sand with the grain, not against it, to prevent unwanted scratches.
Step 4: Intermediate and Fine Sanding
After you’ve removed the old finish with the coarse grit, switch to an intermediate grit (60 or 80 grit) and sand the entire floor again. Repeat this process with a fine grit (100 or 120 grit) to smooth the floor. Remember to vacuum up the dust in between each grit transition.
Step 5: Applying the Finish
Once you’ve finished sanding, vacuum your floor to remove the dust and then wipe it with a damp cloth. Now, you’re ready to apply the finish. There are several types of finishes to choose from, including polyurethane, varnish, and penetrating oil sealers. The choice depends on the look and durability you want to achieve. Use high-quality brushes or rollers to apply your chosen finish evenly on the floor. Follow the manufacturer’s instructions regarding drying and recoating times.
Step 6: Maintenance
After the finish has fully cured, it’s important to maintain your newly refinished floor to prolong its lifespan. Avoid walking on the floor with shoes, especially high heels, and keep pets’ nails trimmed. Clean the floor with a dry microfiber mop to prevent dust accumulation and avoid using water or harsh cleaners.
Remember, the key to a successful refinishing project lies in patience and meticulous preparation. Don’t rush through the steps and take the time to do it right – your hardwood floor will thank you!
This step-by-step guide, combined with our previous post about the essential supplies needed for sanding, provides you with a comprehensive overview of the hardwood floor refinishing process. Remember, both the right tools and the correct technique are crucial to achieving that professionally-refinished look. Happy sanding!
Frequently Asked Questions
How do I know when it’s time to sand and refinish my hardwood floor?
There are several signs that your hardwood floor might need refinishing. These include visible scratches, dents or stains, fading from sunlight, worn-out patches from heavy traffic, or a lack of shine even after cleaning.
Can I sand and refinish my hardwood floor myself, or should I hire a professional?
While it’s certainly possible to sand and refinish your hardwood floor yourself, it requires patience, time, and a degree of skill. If you’re comfortable with DIY projects and have the time, you can achieve good results. However, for large areas or if you’re unsure, hiring a professional might be the safer and more stress-free option.
How long does the sanding and refinishing process take?
The duration depends on the size of the floor, the type of finish you’re using, and your level of experience. Generally, it can take a few days to a week, considering the time needed for sanding, cleaning, applying the finish, and allowing it to dry.
How long do I need to wait before I can walk on my newly refinished floor?
It’s generally recommended to wait at least 24 hours after the final coat of finish has been applied before walking on the floor. However, the actual time can vary based on the type of finish used and the temperature and humidity in your home. Always check the manufacturer’s instructions for the most accurate information.
How often should I sand and refinish my hardwood floor?
It depends on the type of wood, the finish used, and the amount of foot traffic the floor receives. As a general rule, hardwood floors need to be sanded and refinished every 7-10 years. However, with proper care and maintenance, your floor’s finish may last longer.
What should I do if I find nails or staples in my hardwood floor during the preparation stage?
If you find nails or staples, it’s essential to remove them using a pry bar and hammer. Leaving them can damage your sanders and create an unsafe working environment. After removal, fill in any resulting holes with wood filler before you start sanding.
How do I reduce dust during the sanding process?
While it’s nearly impossible to eliminate dust completely, you can manage it by using a shop vacuum to clean up the dust regularly during the process. It’s also important to seal off doors and vents with plastic sheeting to prevent dust from spreading to the rest of your house.
What type of finish should I use for my hardwood floor?
The type of finish depends on your personal preference and the specific needs of your floor. Polyurethane finishes are popular due to their durability and resistance to wear and tear. Other options include varnishes, which offer a traditional look, or penetrating oil sealers, which soak into the wood and provide a natural-looking finish.